


Big Red units – units that cost 3-4 Red – are very strong attackers, but require a heavy commitment to Red tech in order to buy them, which leaves you extremely vulnerable on defense. In this post I’ll go over what big red is strong against and what it’s weak against, as well as what units are good support for big red, and lastly I’ll give a little bit of information about each individual big red unit, since they do have key differences from each other.
Strengths
If you decide to go for a big red strategy, your biggest concern will be staying alive. If you can stay alive and not take too much damage or waste too much tech, you’re probably going to win, because of how much value you get out of your powerful attackers. Because of this, big red is good against strategies that don’t put pressure on you for a long time, since they give you plenty of time to build up an overwhelming amount of attack. This means that big red is good against high economy strategies, since those don’t start making attack for a long time, and also good against very long term units, like Zemora, Resophore, or Savior, since those units also don’t put pressure on you for a long time.
Weaknesses
Big red strategies are weak against aggressive, low economy strategies, since those strategies put the big red player under pressure faster.

They are also weak against burst damage units like Grenade Mech or Drake, as well as aggressive units that sacrifice economy or health for more attack, like Plasmafier or Venge Cannon.


These units do a lot of damage quickly, and are very good at taking advantage of a big red strategy’s weak defense.
Support


Knowing what strategies big red is good and bad against isn’t enough; you also have to know what support for big red there is in the set. If there’s no support for big red in a set, you can lose to a strategy that big red is supposed to be strong against, like Zemora. And, if there’s lots of good support for big red in the set, you may be able to win even against a strategy that big red is supposed to be weak against, like an aggressive, low economy build.
There are roughly three categories of support for big red units: red sinks, tech fixes, and absorbers.
Red Sinks
One of the big problems with big red strategies is that you end up wasting a lot of Red later in the game. One way to avoid this is with Red sinks: units that let you spend your Red cheaply.


Any low-cost Red unit will help, but the units above are especially good red sinks. These units let you get defensive tech (Blue or Green) without being way overteched.
Tech Fixes


These units help you get out a big red unit without needing two Animuses. This is a huge help for big red.
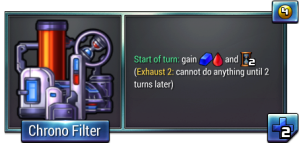
Chrono Filter only works for the three-Red units (Amporilla and Shadowfang), but it is very strong with those units.
Flame Animus can work with the four-Red units, but is best with the three-Red units, since you can combine one Flame Animus with a regular Animus to get those units out smoothly. It doesn’t help as much with the four Red units because you still have the problem of having to go up to four Red income for the rest of the game in order to buy them.
Centrifuge is extremely strong with any big red unit; it lets you get them out while just committing to one Animus.
Absorbers
Good absorbers push a game towards being higher economy, which naturally helps out Big Red strategies. With convenient absorbers like Infusion Grid, you will often get both the Infusion Grid and the big red unit; the convenient absorber helps out a lot with defense.

With the bigger absorbers with more committal tech costs, you often have to choose either the big red unit or the big absorber. Big Red units are one of the few reasons to avoid going for the biggest/best absorber in the set, although it depends on the specific big red unit (Amporilla is an excellent counter to big absorbers; Shadowfang is not).
Sometimes a set with both a big red unit and a big, strong absorber will lead to a rock paper scissors situation: the big red unit beats the big absorber, an aggressive strategy beats the big red strategy, and the big absorber beats the aggressive strategy.
Since Prismata is a turn-based, perfect information game, you don’t need to make any guesses or reads per se (except based off of what your opponent has actually played on their turns). Instead, in these situations you want to delay committing to a strategy until either your opponent commits to a strategy (in which case you do the counter) or the rock-paper-scissors relationship breaks down; often this will be because the aggressive strategy no longer beats the big red strategy (since the big red strategy now has a big enough economy to defend itself), and so you go for the big red strategy.

That covers the stuff that’s generally true about each big red unit. Now let’s talk a little about the specifics of each unit.
Amporilla
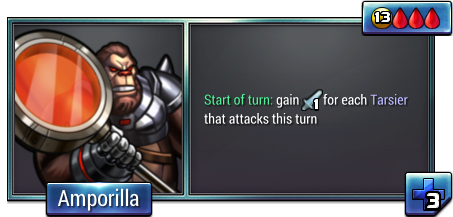
Amporilla’s a crazy strong unit when left alone. Everything I said about big red units in general – good against big absorbers and slow strategies, weak against pressure and burst damage – goes double for Amporilla. Not only is Amporilla itself difficult to get out, but you also want to get as many Tarsiers as you possibly can. An Amporilla with three Tarsiers is about Shadowfang strength – an efficient attacker, but not enough to swing games or provide much of an advantage. A four-Tarsier Amporilla is extremely strong. Anything beyond that is bonkers.
When you’re playing against Amporilla, you need to remember that every bit of breathing room you give them can be used to get an even stronger Amporilla, so pressuring them is very important. When playing as the Amporilla player, your only two concerns are 1) getting a big Amporilla and 2) staying alive. Amporilla is a hard counter to slow strategies.
Lucina Spinos
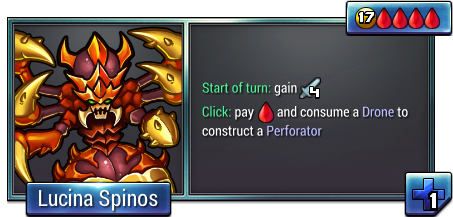
Lucina is very difficult to get out, but if you do manage to get it out it’s the most stable big red unit. This is because once you get it out, it makes its own support; you can use the Perforators it makes to either tech out of Red, or for defense if you’re in a pinch. Because of this, plans to punish a Lucina rush only work if you stomp it very quickly; if you can’t do that (or rush one of your own out even faster), then you will have to defend it and get one yourself.
Shadowfang

The least impactful big red unit. It’s just a vanilla, efficient attacker. Don’t go too far out of your way for Shadowfang; I’d recommend only getting it if it fits into your build quite well.
Tatsu Nullifier
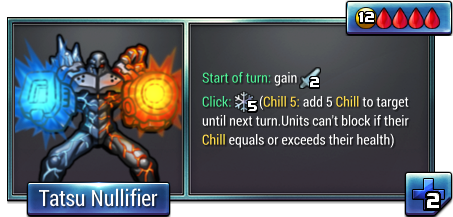
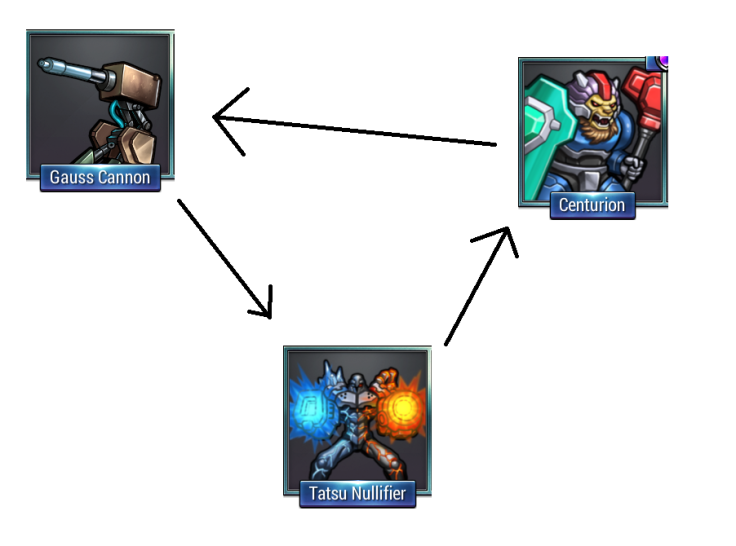
Its powerful freeze ability, combined with its four supply, means that Tatsu is a hard counter to big absorbers. Because a lot of its value is its freeze ability, Tatsu is weak to breachproof. Because it’s so strong against big absorbers, and weak to aggressive semi-breachproof strategies, Tatsu leads to a lot of the rock paper scissors situations I mentioned earlier.
Vai Mauronax
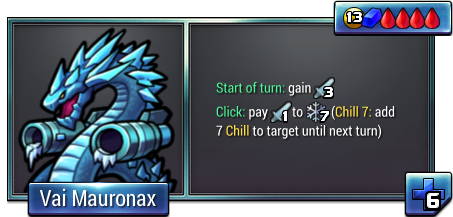
Very good against big, legendary absorbers like Centurion or Defense Grid. Since it’s legendary, you can only make one Vai, meaning it’s not as good a counter to absorb as Tatsu. On the other hand, it is better value, and a bit less vulnerable due to its high health and the Blue in its tech cost.
Conclusion
Big red units, besides Shadowfang, are high impact; they can define the winning strategy. If there’s no support for them in the set, you can usually ignore them, but if there’s good support in the set then they’re a force to be reckoned with.
Because big red strategies have such clear strengths and weaknesses, it’s important to watch what your opponent is doing; if they look like they’re going for a big red unit, get aggressive. If they go for a high economy, consider going for a big red unit of your own. Along with absorbers, these are one of the first units you want to be looking at when you’re reading a set.

I’ve played this set : Shiver yeti – Shadowfang – Lucina Spinos – Thunderhead – Colossus.
I don’t know if your article is supposed to work with this kind of base+5 set but here is what we find out :
It looks like a third engi set, with big red beating big absorber. With a good economy you can get Lucina and then Shadowfang as a “support” unit to spend red.
But I can’t go for big red without 3rd engi otherwise my eco is too slow. And I don’t see neither how you cant play aggressively and beat a 3rd engi.
LikeLike
*how you can
LikeLike
*you can play, sorry
LikeLike
Lucina can lead to some very sharp lines. Player 2’s fastest Lucina is using three Engineers, with this line: 1. DD 2. DDE 3. DDD 4. DAA 5. Lucina. This line is very strong, and player 1 shouldn’t go third Engineer in order to avoid letting player 2 get this fast Lucina without being pressured. So as player 1 I’d want to stay on 2 Engineers. You’re right that it’s difficult to go big red on two Engineers. Player 1’s line to do this with Lucina looks like this: Natural animus (1. DD 2. DD 3. DDA), followed by 4. A 5. Lucina. This is a pretty nutty line, since player 1 just wastes 2 red and floats 6 gold on turn 4. Although this line can be good sometimes, it’s probably not good in this set because I think player 2’s thunderhead line (1. DD 2. DDC 3. DDC 4. DDB 5. Thunderhead) beats it.
So, as player 1, I would just go for slow conduit and wait and see what my opponent did. If they went for Lucina, I would aim to counter it with thunderhead. If they went for a fast thunderhead, I’d also try to counter that with thunderhead, or maybe with Colossus.
LikeLiked by 1 person
Great thank you for these explanations. I don’t know the lines for thunderhead but I tried to play as player 1 slow conduit against Lucina and it worked (1. DD 2. DD 3. DDC 4. DCB 5. WDD 6. Thunderhead+D).
LikeLike
The downside of this line is that turn 4. DCB let p2 going for high-eco instead of Lucina while p1 is already behind an comited :s
LikeLike