In my guide “The Standard Style” I didn’t talk much about breaches except to tell you that getting breached is bad and you shouldn’t let it happen. But, how bad is it, exactly?
Understanding what goes on in a breach is important for playing breachproof strategies, and also for playing with or against chill. So, in this post I’ll talk about allowing breaches, and how bad allowing a breach usually is.
There are three main things that happen when you decide to allow a breach:
1) Frees up resources. Since you’re letting your opponent breach you, you don’t have to make soak, which means you can put more resources into making attackers. The more pressure you are under, the more resources are freed by allowing a breach. If you are under very high pressure that often means that you’re holding Drones and Steelsplitters to avoid a breach. In this case, if you decide to allow a breach then you don’t have to hold your Drones and Steelsplitters anymore, and so you can click them and get more Gold and deal more damage.
2) No absorb. This means you end up taking extra damage. If your absorber is Infusion Grid, and you decide to allow a breach, you’re going to take 3 extra damage.
3) Your most vulnerable units are killed. Once your opponent has breached you, they use any leftover attack to target your most vulnerable units. Often this is Tarsiers, or if you don’t have them, Drones.
There’s one more factor that only shows up in some cases:
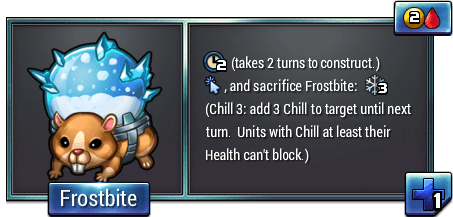
4) Your opponent pays a price. Sometimes in order for an opponent to hit you for the maximum that they can, they have to sacrifice units or make other concessions. A simple example of this is your opponent having to sacrifice Frostbites to breach you. In this case, by allowing a breach, you can exact a toll on your opponent if they choose to take it. This is called a gambit.
1 and 4 are both factors in favour of allowing a breach. 2 and 3 are factors against. Number 4 only matters under special circumstances, so we’ll ignore it for the rest of this post.
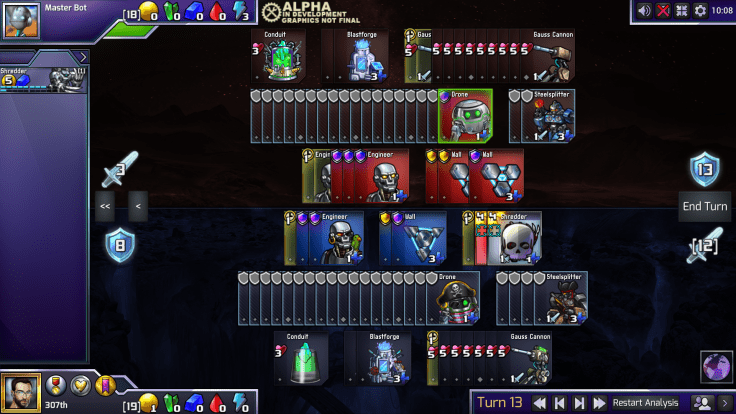
Now let’s see what allowing a breach looks like in a normal game, keeping 1-3 in mind. Here’s a situation where player 2 must choose whether to defend, or allow a breach:

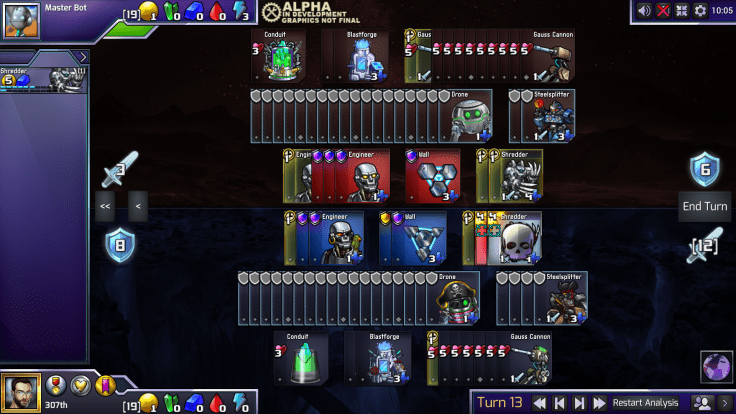
The standard play for player 2 here is to defend by just enough to avoid a breach, and then spend the rest of their resources on making attack. Another option is for player 2 to allow a breach – skip making defense, and instead put all of their resources into making attackers. Here’s defending:
And, here’s allowing a breach:
So, which option is better? Well, let’s look at how each option looks after the dust has settled:
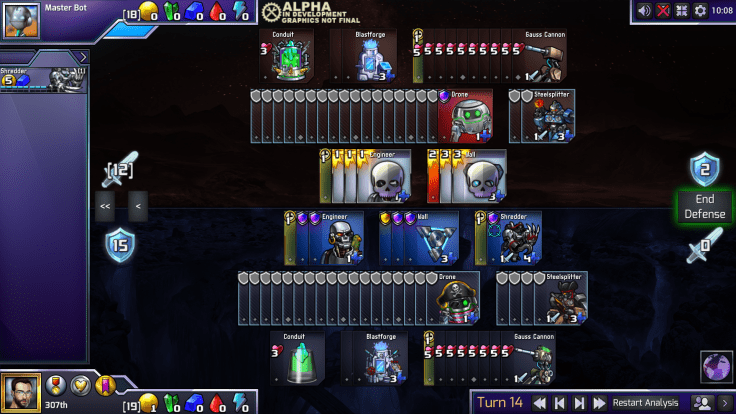
In the defensive option, Player 2 avoided a breach by making two Walls, for a total of +6 health. In the breach-proof option, player 2 doesn’t make that +6 health, instead making two Shredders. So, where does the 6 damage that the two Walls soaked in the defensive option go in the aggressive option? 1 damage goes towards killing the Wall. Notice that in the defensive example, 2 damage is put on the Wall. In the breach example, 3 damage is put on the Wall, killing it. So, 1 damage goes towards killing 3 health – this is factor 2) in allowing a breach, losing absorb. The other 5 damage goes towards killing player 2’s most vulnerable units, Drones – this is factor 3). However, by allowing a breach, player 2 gets two Shredders out (and one extra Gold) – this is factor 1.
So, in summary, by allowing a breach you lose five Drones and one Wall, but gain two Shredders and a Gold. How do we compare these options? This could be a whole post in itself, and probably will be, but for now, let me tell you how I compare them: I use extremely sketchy estimates of how much health every unit is worth. A Wall is worth three health because it’s a Wall and has three health. A Drone is worth one and a half health, because an Engineer is worth one health and costs 2 Gold, and a Drone costs 1.5x as much as that. How much health is one Shredder worth? Four and a half. No, not four, because it can attack, and not five, because if you do attack, they will kill your Drones. The extra Gold is worth half a health, for the same reason a Drone is worth one and a half health. So, now that we’ve got our handwavey numbers, let’s estimate which is better.
5 Drones and 1 Wall = 10.5 health
2 Shredders and a Gold = 9.5 health
So, allowing a breach is about 1 health worse than defending. This is why allowing a breach is usually bad. But we can see how it’s closer than you might think, and under the right circumstances allowing a breach can be good. (And, under other circumstances, it can be terrible).
Now that we understand what goes on in a breach, this will help us understand breachproof strategies and gambits better. Breachproof strategies focus on factor 3 – make your units less vulnerable to a breach, by making high health attackers and – if the random set allows – turning your Drones into high health units.
Gambits revolve around factor 4 – you’re counting on the price your opponent has to pay to breach you making your gambit good.

There’s a lot more to talk about concerning breachproof, chill, and gambits, but hopefully this post is a good starting point.

Leave a comment