This guide will teach you the standard style of play – a style of play that is simple enough for a beginner to be able to learn, while still being grounded in real high level Prismata strategy. It consists of six principles. Each principle on its own will make your play stronger, and taken together, they can take you to Tier X and beyond.
Since this guide covers a lot of ground in a short space, I’d recommend reading it in two goes – first read principles one to three, then a while later read principles four to six.
1: Buy, Buy, Buy

Keep your resources low by buying as much as you can (or close to it) each turn. Focus on buying Drones in the early game, and attackers in the mid to late game.


Both Drones and attackers have a concrete and useful effect each turn – Drones give you a Gold, while attackers deal damage to your opponent. Because their effect happens each turn, the sooner you can buy them, the better. If you manage to make a Drone one turn earlier, that’s one extra gold you just earned, and if you get an attacker out one turn earlier, that’s one more damage that your opponent takes. Prismata is a game of exponential growth, so this type of advantage can snowball quickly. Because of this, you should aim to get Drones and attackers out as quickly as you can. Every resource you spend on an investment, like a Drone or an attacker, will pay for itself quickly, and after that will only gain more and more value. The sooner you spend those resources, the more value you get out of them.
The only resource this advice doesn’t fully apply to is Energy. Energy is only important to spend in the early game, when Drones are a priority. In the mid to late game, when attackers are higher priority, Energy becomes unimportant and it’s fine to let it go to waste.
Red and Blue, on the other hand, are especially important to spend each turn, since they are valuable and disappear at the end of your turn if unspent. Wasting Red or Blue is occasionally correct, but not very often.

Aim to spend your Gold and Green too. Even though these resources don’t disappear at the end of your turn, it’s still valuable to spend them quickly on Drones or attackers. As a rule of thumb, having one or two Gold or Green left over at the end of your turn is fine, but try to avoid floating three or more.
2. Live on the Edge
By putting off defense until the last minute, you can get your Drones and attackers out faster, which means getting more Gold and dealing more damage. So each turn, build only the defense needed to avoid a breach – that means having at least one more defense than they have attack. Once you’ve made that breach warning go away, switch to making Drones or attackers instead.
The important thing to realize is that there’s no advantage to buying defense early. This is why Drones and attackers take priority over defense. Look at a unit like Wall or Forcefield – it doesn’t do anything except block. If it’s not blocking your opponent’s attack next turn, it’s not doing anything useful.
But just how long can you put off making defense for? If you cut it too close, won’t you get taken by surprise, get breached, and lose? Surprisingly, no. Most defense in Prismata is Prompt, and since the game displays the maximum damage your opponent can do next turn, so as long as you buy enough Prompt defense to make that breach warning sign go away, you’re fine. Once you’ve done that, put the rest of your resources into Drones or attackers. This might feel scary at first, but it’s actually quite safe, and the benefits are worth the risk.
I should talk a bit about Prompt blockers versus non-Prompt. Prompt blockers are constructed immediately, which makes them ideal for this “just in time” approach to defense. However, non-prompt blockers have their strengths too. In order to compensate for the disadvantage of being slow to build, non-prompt blockers have a higher health than Prompt blockers – compare Wall to Infusion Grid:


Because of this, defending with non-prompt blockers is fine, but can take a bit more planning than defending with prompt blockers. You still want your non-prompt blockers to be useful as soon as they finish building, so make sure you don’t make too much non-prompt defense and end up with more defense than you actually need.
I should note that even though cutting your defense close is good, actually allowing a breach is very bad. When you get breached, you can’t absorb any of your opponent’s attack, meaning that you take more damage, and on top of that they get to target your most vulnerable backline units, like Drones or Tarsiers. Because attack rises throughout a game of Prismata, defending gets increasingly difficult as the game goes on, but it’s still almost always correct to defend enough to avoid a breach.
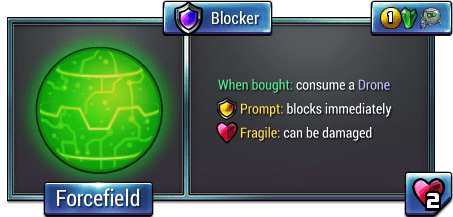
There is one exception to the rule of putting off defense until the last minute. In this section, we’ve been talking about defense that doesn’t do anything except die on defense. This defense is called soak. Most defense is soak, and whether it’s prompt or non-prompt, you still want to put off building it as long as possible. However, not all your blockers have to die on defense – if you put damage on a blocker that isn’t enough to kill it, it instantly regenerates (as long as it isn’t Fragile). This is called absorbing damage, and is the subject of the next section.
3. Absorb is Awesome

Absorbing damage is really good, so go for the biggest blocker in the set and absorb on it.
To see how strong absorb is, let’s compare absorb to attack. Making two Steelsplitters costs 12BB, and does two damage per turn. A Wall can absorb that two damage per turn, and costs 5B.


So, in this case, absorb is over twice as efficient as attack. It has to be this strong, because absorb is Prismata’s defender’s advantage.
Defender’s advantage is put in games in order to make the decision between investing in economy and making attackers interesting. In RTS games like Starcraft, the primary defender’s advantage is the distance that the attacker has to travel to get to their opponent’s base. If players started right next to each other, the game would be much less interesting. In Prismata, the defender’s advantage is absorb. It’s an effective way to counter early attack that discourages players from going for an early rush.
Due to the way assigning damage works in Prismata, you can only absorb on one unit per turn. The simplest way to absorb more damage is to get a big blocker that can absorb a lot. A 3-health unit can only absorb a maximum of 2 damage, since it dies if it takes any more than that, while a 6-health blocker can absorb up to 5 damage. So, go for the biggest blocker that you can in each set, and absorb on that each turn.
There are some exceptions to this rule – for example, Redeemer is better to attack with than to absorb on, and Energy Matrix is a better absorber than Omega Splitter even though Omega Splitter has more health. Still, it’s a good starting point. If you want more information on absorbers, you can go to my post on Absorber Rankings.

4. Changing Gears
Because of how absorb works, Prismata is a game with fairly distinct phases. In RTS games, the travel distance between bases remains a factor throughout the game, which means that there’s always some level of defender’s advantage. In Prismata, there’s a maximum amount of damage per turn you can absorb – the health of the biggest blocker in the set, minus one. Once you’re absorbing that much damage per turn, you have no more defender’s advantage – you won’t be able to absorb any additional attackers your opponent makes. The same goes for your opponent, of course – once they’re absorbing for maximum, they won’t be able to absorb any attackers you make.
This doesn’t mean you can’t defend at all, mind you. It just means that defending is harder – you have to defend by making soak every turn which tanks the damage and dies. Attackers that get absorbed are weak, but attackers that are doing damage every turn are very strong, forcing out defense every turn for the rest of the game. This is why you eventually switch from making Drones to making attack – even though your first attackers get absorbed, the power of the later attackers that do damage is worth it. Once you’re over the absorb barrier and actually doing damage, attackers take priority over Drones because of how high value they are.
The upshot of this is, in the early game make Drones, and once you’ve built up your economy enough, switch to making attackers.
The switch from making Drones to making attackers is fast, but not instantaneous. There will usually be a few turns of transition, where you are still making some Drones, adding on tech buildings you’ll need, making a few attackers, and, once your opponent has some attack out, making an absorber.
5. How Many Drones Do I want?

Economy size is an important decision in Prismata. You should mostly base it off of the size of the biggest absorber in the set. Absorb is what’s holding you back from making attackers, so the more that can be absorbed, the more economy you need before you should switch to making attack. In the base set, the absorb barrier (the maximum absorb possible) is 2. This is a pretty small amount, so you should make the switch from Drones to attackers pretty early, at around 12-15 Drones. If the biggest blocker has 5 health, the absorb barrier is 4. You want more like 20 Drones in this case. So, at the start of the game, find the biggest blocker in the set, and use that to decide how much economy you want.
You don’t need to aim for an exact Drone number – just having an idea of roughly how many you want is fine. If the biggest absorber has 5 or more health, go for a third Engineer build, which will let you go for high economy. If the biggest absorber only has 3 health (i.e. Wall), stay on two Engineers. If the biggest absorber has 4 health, use your own judgement – if the rest of the set seems aggressive, stay on two Engineers; if it seems defensive, go up to three.
6. Setting Up Your Tech

Once you know how much economy you want, it’s time to decide what tech you want. I said back in part 1 that you should spend your tech resources (Red, Blue, and Green) and avoid letting them go to waste, but this is easier said than done. It’s a common and easy mistake to make too many tech buildings and get more tech resources coming in than you can spend. This is because, although Blue, Red, and Green are all valuable resources, they all typically can’t be spent without also spending Gold. Think of trying to spend a Blue using units in the base set – you can either get a Wall or a Steelsplitter, but a Wall costs 5 Gold as well as the Blue, and a Steelsplitter costs 6.
So, we’ll have to be careful we don’t overtech. A good rule of thumb is that one Conduit requires 3 Gold per turn to spend, one Blastforge requires 5 Gold per turn to spend, and one Animus requires 8 Gold per turn to spend.
Your tech setup will need to let you get your absorber out, while also making both attack and defense. Keep that in mind when choosing what tech buildings to make. If you want more advice on how to choose your tech setup, you can check out Introduction to Set Reading.
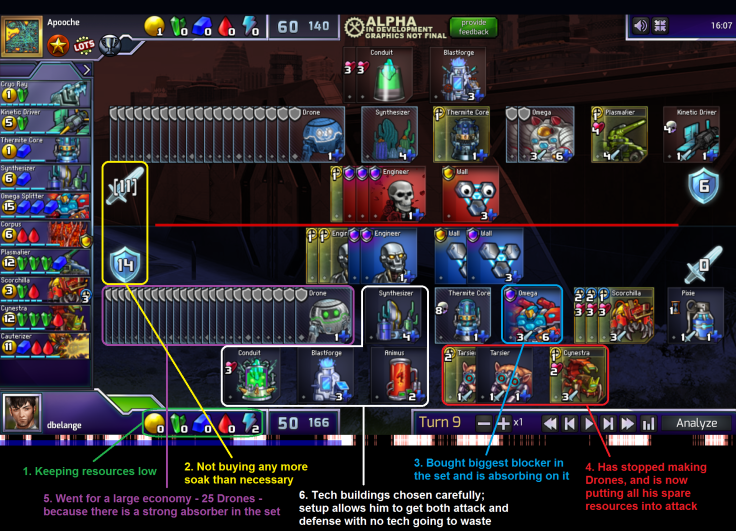
In a Real Game
Here is an example of the principles talked about in this guide being used in a high level game. Both players are playing in the standard style, even though they have chosen to go for diverging strategies.
Conclusion
There’s a lot of information here, and it will take a while before you have the experience necessary to apply all of these principles consistently in-game. Still, once you are able to do this, you will find that it makes any strategy you decide on more powerful and effective.

Leave a comment