Edit: Units are up-to-date as of February 3rd, 2019.
It’s time to learn more about the different absorbers in the game. In The Standard Style I recommended that you go for the biggest absorber in the set – the idea being, absorb is broken, so you want to get as much absorb as possible. This is a good starting point for beginners, but here we’re going to get more advanced than that. I’m going to rank the absorbers from best to worst, based on three factors: value, convenience, and clunkiness.
Value
Value is the most important factor for an absorber. Absorb is Prismata’s defender’s advantage – it exists to make building economy good, by letting high economy builds counter early attack effectively. Absorb does this by being insanely good value; you nullify your opponent’s first attackers at a fraction of their cost. The value of the absorber is the single biggest factor that determines economy size in a game – the better value the absorber, the more economy you want. Bigger absorbers are usually better value, but not always:


Energy Matrix gets four absorb per turn, is Prompt, and costs 8BB. Omega Splitter gets five absorb per turn, but is non-prompt and costs 15BBB. One extra absorb isn’t worth paying an extra 7B for, especially when it takes one more turn to build. Omega Splitter does have the advantage that it threatens three damage, but overall, Energy Matrix is still the better unit.
Value can also be referred to as “strength” or “power”.
Convenience
Convenience is about how easily the absorber fits into your build. Cheaper and lower-tech units tend to be more convenient, but it depends on what you’re going for. For example, Infusion Grid is usually much more convenient than Mahar Rectifier; but if you’re going for a Zemora, then Mahar is more convenient, since you’re already on Green tech.


Clunkiness
This is similar to convenience, but not quite the same. Clunkiness is about how hard it is to get full value with the absorber. “Full value” means absorbing for maximum as soon as the unit finishes construction; it also means not taking too much damage before getting the absorber up and running.
Some units are really easy to get full value with; for example, Wall or Energy Matrix. Other units are really difficult; like Colossus or Doomed Wall. In general, bigger absorbers are clunkier.
Using The List
The ranking list is intended to help you pick an absorber when there’s more than one absorber in the random set. If one absorber is in a higher tier than the other, go for the one in the higher tier, unless you have a very good reason not to. If the absorbers you’re picking from are in the same tier, feel free to go for the one that you feel is best for the situation you’re in, but if you’re unsure, default to the absorber that’s higher within the tier.
If you just want the list, without pictures or more information, you can skip to the bottom of the post for a TL;DR list.
Tier List
S Tier
Centurion
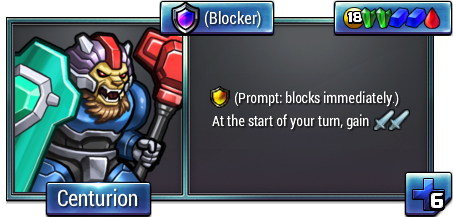
Centurion is the strongest (highest value) absorber in the game. Usually really big absorbers have a problem with being inconvenient and clunky, but Centurion doesn’t do too badly on those counts either. It is very expensive in tech, but you want to go for a high economy in Centurion sets anyway, so going for a Green-Blue-Red tech setup isn’t too bad – getting all three colours means you can usually get both good attack and good soak. Centurion is also quite dependable – it’s Prompt, and doesn’t have lifespan or anything, so it can usually get full or near-full value. When Centurion is in the set, it’s nearly always correct to go for it; the only common reason to avoid Centurion is the presence of extremely powerful Big Red units in the set – namely Vai Mauronax, Tatsu Nullifier, or Amporilla.


Even then, you can sometimes go for Centurion with these units in the set, depending on how much support there is for the Big Red units versus how much support there is for the Centurion strategy.
A Tier
Defense Grid

This is the second strongest absorber in the game. Like most big absorbers, Defense Grid is hard to fit into builds and hard to get full value with (i.e. it’s inconvenient and clunky). Its tech cost is actually more restrictive than Centurions, because you want a tech setup that is good at both attack and defense; three Blue is only good at making defense. You also have to watch out for Chill with this unit; it’s quite vulnerable to being frozen. Because you need so much Blue tech with Defense Grid, it benefits a lot from other Blue units being in the set (or, put another way, Defense Grid has a hard time in sets where you can only buy Walls and Steelsplitters with your Blue after you’ve got your Defense Grid).
Defense Grid also benefits a lot from Blue sinks, like Steelforge, or ways of getting Blue that don’t require you to invest in three Blastforges, like Synthesizer.


Despite all its drawbacks, Defense Grid is extremely powerful, so you should go for it unless there’s very good reason not to.
Energy Matrix

Really good value, convenient, and reliable. This is a good unit. In terms of value, Energy Matrix is “only” the 4th strongest absorber, but its convenience and reliability puts it in 3rd place overall, and some would argue 2nd.
Colossus
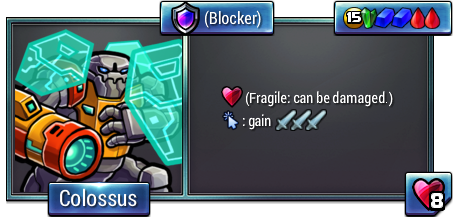
Colossus is the third strongest absorber, and when the stars align, it can even be a more powerful absorber than Defense Grid. It also isn’t too inconvenient – it requires a similar tech setup to Centurion, and we’ve already established Centurion’s tech cost isn’t too bad for a big absorber. So why is it coming in fifth place in the overall rankings?
Colossus – or “Colunkus” – is the clunkiest absorber in the game. Your opponent needs to have 7 damage per turn before you can get full absorb with Colossus, and on top of that, because Colossus is Fragile, you need to make a new Colossus every turn in order to keep absorbing on him. Even if you manage that, there’s only four Colossus in supply, so after four turns you’ll have to switch to a new absorber whether you like it or not.
As an aside, although technically fragile units don’t absorb, units like Colossus are still counted as absorbers, because they still fill the role of an absorber on the turn you’re defending with them. With Colossus, the idea is that you block with Colossus, get it to 1 health, then attack with it for the rest of the game. Most absorbers reward you for keeping them alive with health; Colossus rewards you with attack. Because of this, Colossus tends to accelerate the pace of games, and this makes continuing to absorb on Colossus difficult.
Xeno Guardian
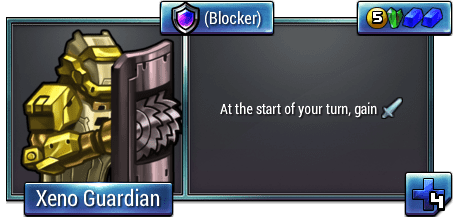
Similar to Energy Matrix – good value, and reliable. A little bit less convenient, since you need the Green, and not quite as strong. Still, it’s good. This unit is vigilant – it attacks and defends at the same time – so if you get multiple Xeno Guardians, they’re good at playing around threat, as I covered in Defending Against Threat With Vigilance.
B Tier
Infusion Grid

In terms of value, Infusion Grid is decent but not amazing – it’s basically a better Wall. Still, it’s super convenient and easy to use, so it gets to the top of B tier. This unit can fit into just about any build, so Infusion Grid can be good in sets where a bigger absorber like Centurion wouldn’t – for example, Amporilla sets.
Its convenience also makes it a good bridge absorber, that you can absorb on while moving towards a bigger, clunkier absorber like Defense Grid.
Bombarder
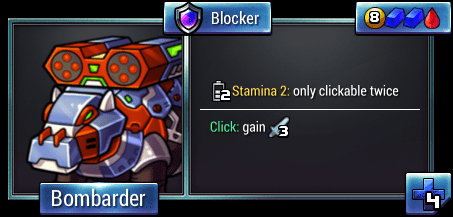
A very strong unit in general, and also a good absorber. However, it’s not particularly good to absorb on while it’s on 2 stamina, in the same way that absorbing on Redeemer isn’t very good. The best time to absorb on Bombarder is when it’s on 1 or 0 stamina. On 1 stamina, the advantage is that you get the defensive value right away, and attacking with it doesn’t actually increase your pressure on your opponent (you deal 3 damage, but lose 3 pressure since it can’t attack anymore). On 0 stamina, the advantage is that your opponent can’t play around the 3 threat. Usually 1 stamina is better, because you get absorb value sooner, but you can consider clicking your 1-stamina absorbing Bombarder if your opponent is playing around your threat (e.g. with Ossified Drones).
Unlike most strong absorbers, Bombarder being the best absorber in the set encourages small economy sizes. This is because the player who attacks first gets to absorb with Bombarder first.
Urban Sentry
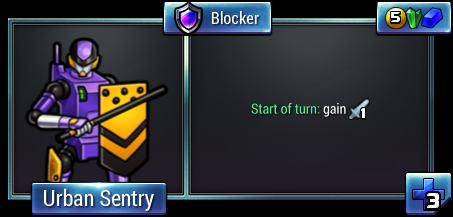
Very similar to Infusion Grid – it’s slightly worse value than most of the units below, but it’s miles ahead of them in terms of convenience and un-clunkiness.
Urban Sentry is a great choice for your first attacker – it does 1 damage, which is hard to shut down super efficiently (unlike 2 damage, which gets shut down very effectively by a Wall), and since it’s vigilant, you often won’t have to worry about defense for the next few turns, meaning that you can follow it up with more attackers and get over the absorb barrier to get real value.
Since Urban Sentry is vigilant, it’s also great for playing around threat. All around, it was very close to dethroning Infusion Grid as the king of B tier, but didn’t quite make it because it requires Blue-Green tech instead of just Blue tech.
Omega Splitter

Omega Splitter is better value than Infusion Grid if you can pull it off, but its tech requirements are pretty inconvenient. Like other units that can either attack or defend, part of its value comes from the threat of attacking with it. Although it’s good value, its tech requirements are prohibitive, and it’s viable less often than a lot of the lower-ranked absorbers because of this.
Doomed Wall
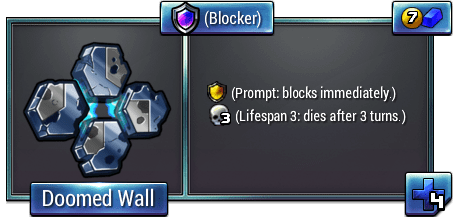
Similar in value to Infusion Grid, but its 3 lifespan is a liability. Because it’s Prompt, its lifespan ticks down faster than you’d expect. This unit is countered by Chill, and can be exploited in other ways as well. Still, it’s extremely easy to fit into builds and is pretty good value.
Xaetron

Xaetron is strange. In terms of value, Xaetron is actually the weakest absorber in the B tier. It’s also the most inconvenient absorber in the B tier to get except for Omega Splitter. However, Xaetron’s weird mechanics have a lot of unexpected benefits which make it useful and dependable.
Although Xaetron is fragile, it heals 4 health every turn. Since it heals the same amount no matter what, it’s immune to granularity exploits. In fact, as long as it’s below 12 health, it will gain health even if you didn’t absorb on it. Because of this, a common tactic with Xaetron is to alternate between absorbing on Xaetron and a different absorber, like Wall or Infusion Grid. You have to overdefend in order to do this, but it lets you get extra absorb – you get the regular absorb and the Xaetron’s +4 health.

Overdefending by 5 is quite expensive, though, so don’t feel obligated to alternate between Xaetron and another unit.
Because it can gain health even when it’s not being damaged, this means that even if you buy Xaetron before your opponent’s attack is up and running, it can still get value. It’s the opposite of clunky – it’s very hard for an opponent to deny Xaetron value. Even if they do manage to set it up so that they can do less than 4 damage when Xaetron is at 12 health, you can just click the Xaetron to attack with it instead. Xaetron is also good against Chill, because it can play around threat (remember, threat gets value from making people overdefend – but overdefending with Xaetron is good, because you can absorb on a regular absorber while your Xaetron gains health). Because of all these benefits, Xaetron makes the middle of B tier, despite being inconvenient and not being as good value as the other units here.
Doomed Mech

Pretty good value, and pretty convenient, but because of its Lifespan, it’s vulnerable to Chill, as well as other exploits, so it’s quite clunky.
Mahar Rectifier

Another Fragile absorber. If you absorb on Mahar, getting it down to 1 health, it will instantly heal back up to 3 health, and need 1 more turn to rest before it gets back to 5 health. This means that in order to absorb on Rectifier, you usually want a pair of them – you alternate which Mahar you’re absorbing on each turn.
Around the same value as Doomed Mech – it costs a bit more, but it’s permanent. It’s slightly more inconvenient due to its tech cost and due to needing 2 of them, so it gets ranked lower.
Feral Warden
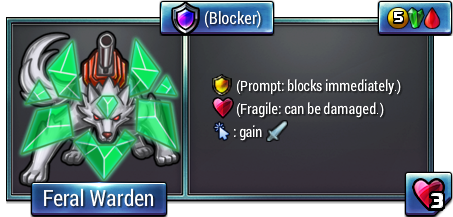
Since Red is more of an aggressive colour, it makes sense that the Red-Green absorbers typically aren’t as strong as pure Green or Blue ones. Feral Warden is pretty handy since it’s a way to get better-than-Wall absorb with just red-green, which is usually impossible. Because it turns into a long-term attacker, instead of defense, Feral Warden is a good absorber early game, but less good later on. Feral Warden mirrors tend to be extremely cut-throat – players are desperate for defense in no time.
Odin
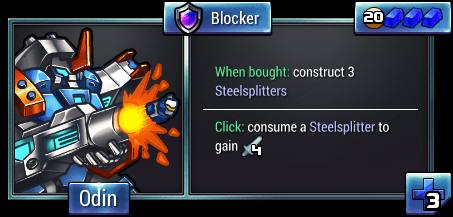
Odin’s a powerful attacker, but is only OK for absorbing, hence his low ranking.
Some absorbers, like Centurion or Xeno Guardian, come with some attack. This usually just works as icing on the cake – they’re primarily defensive units, but they get some damage in too. Odin is an absorber where most of his value comes from attack and threat. Because of this, Odin is often worth buying even before your opponent has any attack up – this is unusual for an absorber.
Odin needs other good Blue units in the set in order to be worth going for – for example, Manticore or Grenade Mech.


Absorbing on Odin is usually better than clicking with him and absorbing on a Wall instead. But if you have a better absorber than Wall lying around, it will usually be better to click your Odin and absorb on that instead. The reason Odin as an absorber is better than Wall is because he comes with four threat; your opponent has to make four extra defense, because if they don’t, you could click your Odin and breach them. But if they do make the four extra defense, you can just hold your Odin and absorb on him.
Chieftain
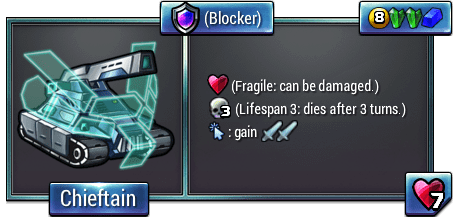
This unit is primarily a soak unit, instead of an absorber; usually you buy it, attack with it once or twice, and then use it as soak while absorbing on something else. But Chieftain can actually work as an absorber too. You buy it, and when it’s on lifespan 3 you put 6 damage on it to get it to 1 health, then attack with it twice before it dies. Since you have to keep buying a Chieftain each turn in order to keep absorbing on Chieftains, it’s pretty clunky, but it is good value.
C Tier
Protoplasm
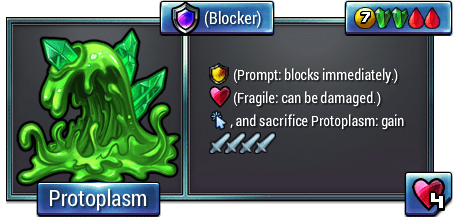

Feral Warden’s impatient cousin, Protoplasm, is the opposite of Feral Warden: it’s bad early on (when you’d rather be making long-term attackers like Tarsiers with your Red) and good later on, when the four damage does a lot of work. In Protoplasm mirrors, the player who went a bit higher economy and absorbed on Wall at first tends to win.
Wall

Wall is very convenient and reliable, but not that strong. It’s often good as a ‘bridge absorber’ to absorb on while you set up for a bigger absorber. In sets where there’s no good absorber in the random set, Wall is your go-to; you’ll want to stay on two Engineers when that’s the case.
A few other units that can also absorb and are around as good as Wall: Borehole Patroller (one less absorb, but one more damage per turn); Lancetooth (you lose 2 damage by holding it, but gain 4 health tempo and one absorb), Mega Drone (similar to Lancetooth).


Rhino Tier
Rhino

Red is the colour that’s good at attack, and bad at defense, so it makes sense that pure Red absorbers suck. Still, even absorbing on Rhino is better than nothing, so if you’re going for a pure Red strategy, then you want to absorb on Rhino (or one of the many other 2-health Red units).
That does it for the regular tier list. There’s one absorber I haven’t mentioned:
So Weird That I’m not Putting It On The Main List Tier
Arka Sodara
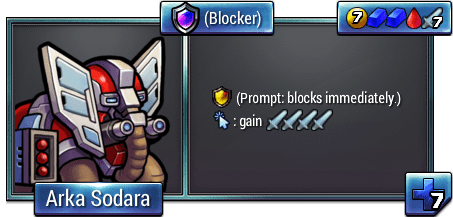
Arka Sodara is insanely high value – under the right circumstances, it can be even better value than Centurion. In terms of convenience, it’s not that hard to fit into a build. However, the fact that Arka Sodara costs 7 attack makes it work strangely. It’s weirder than any unit in the main list, which is saying something.
Units that cost attack are good at denying absorb – the idea is, if your damage would get absorbed, you spend the attack on that unit instead. This means that Arka Sodara is an absorber that’s good at countering absorb, which leads to a weird situation where both players could buy Arka, but neither player wants to, because if they buy Arka then their opponent will counter their Arka with one of their own. When this happens, the first Arka Sodara gets no absorb, but the second one does, giving a decisive advantage to the second Arka.
This doesn’t mean that Arka never gets bought – for example, often the first Arka denies some absorb too, and the second Arka player has more than 7 attack and so the first Arka player gets some absorb with their Arka. It does mean, however, that Arka doesn’t work the way regular absorbers do. For every absorber on the regular list – even the really weird ones like Xaetron – the higher that absorber is on the list, the more economy you want if you think that absorber will see play (more or less; units that are high-value but inconvenient and clunky, like Omega Splitter, lead to higher economy games than lower-value but more convenient absorbers that are higher on the tier list like Infusion Grid). Because Arka isn’t a guaranteed way to counter damage like normal absorbers are, Arka doesn’t t have an effect on economy sizes; so instead you should look at the best non-Arka absorber in the set and base your economy size on that.
An unanswered Arka is insanely good value, so if your opponent is getting ready to buy Arka, you need to be prepared to counter-Arka.
TL;DR list
S Tier
Centurion
A Tier
Defense Grid
Energy Matrix
Colossus
Xeno Guardian
B Tier
Infusion Grid
Bombarder
Urban Sentry
Omega Splitter
Doomed Wall
Xaetron
Doomed Mech
Mahar Rectifier
Feral Warden
Odin
Chieftain
C Tier
Protoplasm
Wall
Rhino Tier
Rhino
and, separate from the rest of the list:
So Weird That I’m not Putting It On The Main List Tier
Arka Sodara
Hopefully this ranking helped you understand absorbers better!

Leave a comment