Prismata isn’t a game where you can use the same opening every time; the random set changes things up too much from match to match. That said, you need to start somewhere, with some good go-to builds that you can lean on. In this post I’m going to go over the most common openings used in high level play. In future posts, I’ll talk about general principles for coming up with openings on your own, as well as how to come up with a gameplan that helps you choose what opening to use.
Opening Notation
Before we can get into the openings themselves, we need to cover opening notation. It’s pretty simple. You write the turn number, and then follow it with the units you build on that turn. For example, the “Natural Animus” build is 1. DD 2. DD 3. DDA.
It’d be pretty clunky to write “1. Drone Drone, 2. Drone Drone” so we just shorten Drone to D, which is the hotkey for building it. Conveniently, all of the base set units have the same hotkey as the first letter in their name, so it’s pretty easy to figure out what unit is meant by what letter – Animus is A, Blastforge is B, Conduit is C, and so on. When it comes to advanced set units, there’s no fixed abbreviation because there’s too many of them – we don’t shorten Xeno Guardian to X because there’s also Xaetron, for example. So instead, we still use the hotkey for building them, which will be a number from 1-11, and will change from set to set. Don’t worry too much about advanced set units, since in this post we’re only going to be talking about openings using the base set units.
Now let’s get into the openings:
Player 1 Openings
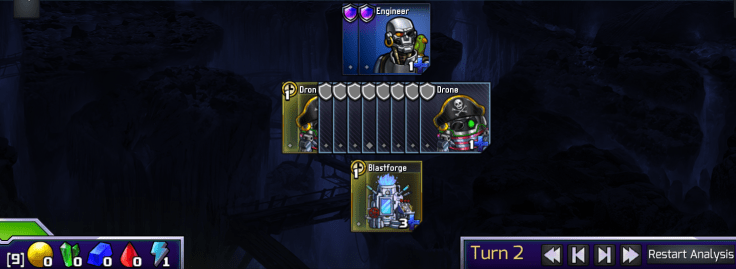
Slow Conduit: 1. DD 2. DD 3. DDC
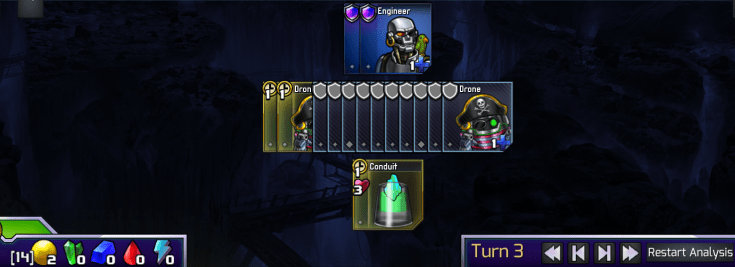
This is a flexible, medium-economy build. However, it’s inefficient. We’ll go more into what makes a build efficient or inefficient in a later post, but the basic rule is that in the opening, wasting Energy and leaving Gold unspent are inefficient. (Wasting Energy is fine later on, since you don’t want to make Drones in the mid or late game.) This opening doesn’t waste any Energy, but it leaves two Gold unspent on both turn 2 and turn 3, and often you also have to either float Gold or waste Energy on turn 4 as well – for example if you want to go 4. DDB, you have to float 3 Gold. Still, this opening is a good choice some of the time.
Natural Blastforge: 1. DD 2. DD 3. DDB
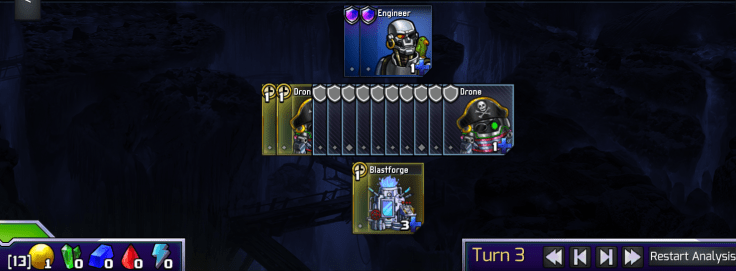
Medium economy, safe, and more efficient than the Slow Conduit opening, but not so flexible, since Blue decays at the end of your turn if it isn’t spent – this restricts your options, since you have to spend the Blue if you want to be at all efficient. Another problem Natural Blastforge has is that Blue is good for defense, but bad at offense. So, if your opponent isn’t threatening any attack on turn 4, you might not have much to do with your Blue. Because of this, you only want to do this opening when you’ve got a good Blue unit to lead off with in the random set – for example, Ebb Turbine or Flame Animus.
Natural Animus: 1. DD 2. DD 3. DDA
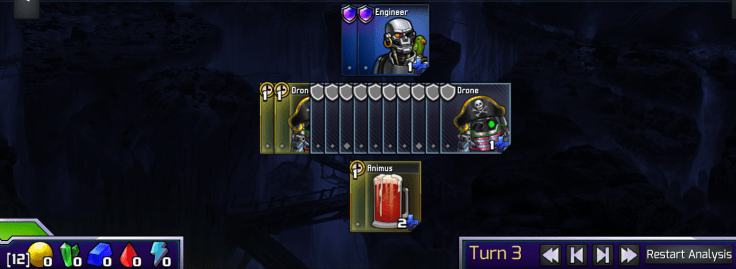
More efficient than Natural Blastforge, and, unlike Natural Blastforge, with this opening you’re very happy to be left alone. Tarsiers are in the base set and are an excellent way to get your attack started, so you can always spend your Red on Tarsiers and be pretty happy. The downside: Natural Animus is even less flexible than the Natural Blastforge opening, and also has a hard time defending. It’s less flexible because you really want to spend the two Red you get every turn, since they go to waste otherwise, but spending two Red per turn tends to cost a lot of Gold. For example, if you are planning on making two Tarsiers per turn, that’s 8 Gold per turn that is locked down on making Tarsiers. It’s bad on defense because Red units are poor defenders, and the lack of flexibility can make it difficult to get defensive tech without losing efficiency. If your opponent leaves you alone for a while, then you can get a Blastforge up fairly naturally with 4. TTD 5. TTB, but often you don’t have that much time, and have to waste a Red by going for 4. TDB.
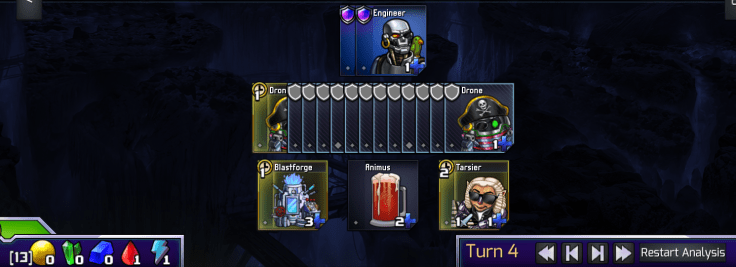
Third Engineer Blastforge: 1. DD 2. DDE 3. DDD 4. DDDB
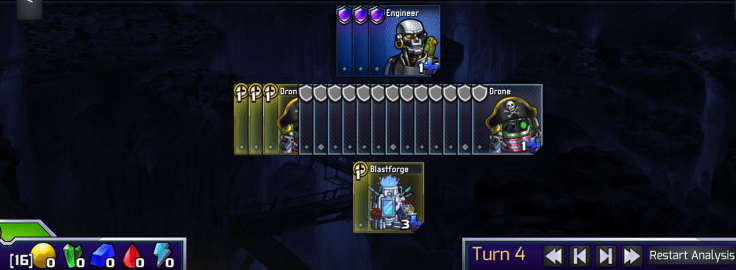
This an efficient high economy build, and is the build player 1 uses most often in high level games. It’s also quite safe. However, unlike in RTS games like Starcraft, just because a high economy build is safe, that doesn’t actually mean it will beat lower-economy builds. I cover this more in The Standard Style, but basically, low-economy builds can still out-value high economy ones by building up lots of long-term attackers like Tarsiers.
As a rule of thumb, you should go for a third Engineer build when there’s an absorber bigger than Wall in the random set – for example, Infusion Grid.
Third Engineer Conduit: 1. DD 2. DDE 3. DDD 4. DDDC

This build is greedy. Unlike the Blastforge opening, this opening is vulnerable to attack, because it has no way to make an absorber on turn 5. Usually, you can only get away with this build if your opponent also went for a third Engineer opening. That said, if your opponent did go for a third Engineer opening, this build is often a good choice, because the Green doesn’t need to be spent next turn. If you go for third Engineer Blastforge against an opponent who went also went third Engineer, you can run into the same problem that the Natural Blastforge opening runs into – no good way to spend your Blue, since you don’t need any defense and Blue is bad at making attack. This build is a handy way around that problem.
Honorable Mentions
Some openings that didn’t quite make the cut for P1:
Fast Conduit: 1. DD 2. DC.

This opening is why Slow Conduit is called Slow Conduit, but it’s not used often enough to be included as a main opening. Player 1’s standard Zemora Voidbringer line uses this build though – it goes 1. DD 2. DC 3. DDC 4. DD1 (where “1” is Zemora).
Elyot Animus: 1. DD 2. A.
This opening has a pretty cool backstory – the short version is that people felt player 2 was too favoured in sets where red rushes were good, because P2’s Fastimus opening (which we’ll be talking about shortly) is better suited for rushes than Natural Animus. However, Elyot showed that the problem could be solved by rushing even faster, with an Animus on turn 2; no one had considered it seriously because of how horrifically inefficient it is. But, due to some cool strategical reasons that Elyot talks about in his blog post on rush timings, the build actually works well in red rush sets despite its apparent ugliness.
That said, most sets aren’t hardcore red rush sets, so use this build sparingly.
P1 Masterbot: 1. DD 2. DB.
The masterbot used to really like early Blastforges for some reason, hence the name of this opening. 80% of the time this build is used, it’s for Flame Animus, and 20% of the time, it’s a mistake. This build has the same issue that the other Blastforge first builds have, which is that it can be hard to find something good to spend the Blue on, but even more so, because you got the Blastforge even faster. Still, there are some advanced Blue units that are good to buy early, either because they’re economical (like Ebb Turbine or Synthesizer) or they’re good early attackers, like Flame Animus. However, the economical Blue units aren’t worth rushing this fast – if your plan involves making more economy, don’t cut a Drone on turn 2! – and that’s why this build is only good with Flame Animus.
(Alright, there are legitimate uses of this build that don’t involve Flame Animus, but they’re rare, and more often than not you’d be better off going for Natural Blastforge.)
Player 2 Openings
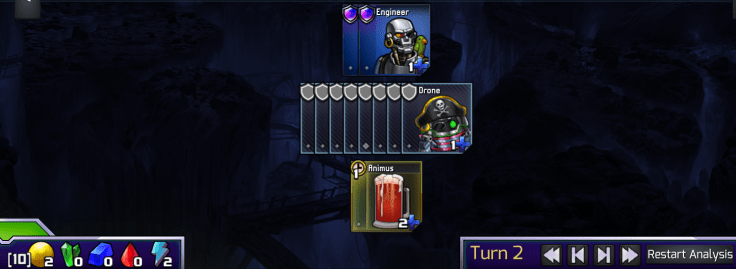
Fastimus: 1. DD 2. DA

Animus is a hard unit to fit into builds. Both player 1 and player 2 only have one good Animus-first opening; this is player 2’s. It’s slightly less efficient than Natural Animus, but makes up for it by getting attackers going faster. It’s a surprisingly legit build – in fact, current analysis says that Player 2 wins base-set-only using this build (just barely).
Natural Conduit: 1. DD 2. DDC (3. DDB)
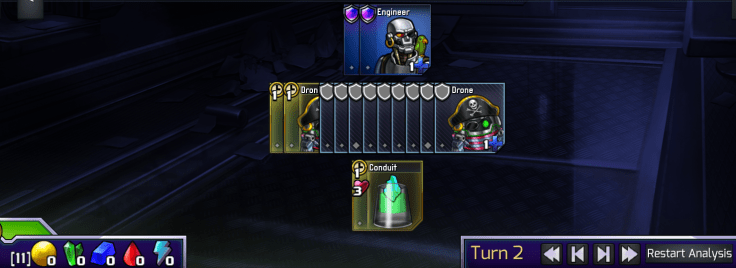
I put the 3. DDB in brackets, because you don’t always follow up with a Blastforge, but it fits into the build so well that you do it about 80% of the time. Anyway, this is probably the most-used opening in the game right now. It has all the benefits of player 1’s Slow Conduit opening – medium economy and flexible – but is also crazy efficient.
Natural Conduit is a great medium-economy Green opener, which is useful in a lot of sets, but it’s not always a good choice. In sets where there’s a good absorber, and so you want a high economy, or in sets where there aren’t many green units, so you want Red or Blue, you should go for something else. Still, “when in doubt, go Natural Conduit” is not a bad rule of thumb for when you’re player 2.
Third Engineer Natural Conduit: 1. DD 2. DDE 3. DDDC (4. DDDB)

Like Natural Conduit, but higher economy and a bit less efficient (since it floats two Gold on turn 2). This is your go-to build in high economy sets. You might have noticed that Player 2 is more restricted than player 1 when it comes to choice of tech – with the exception of Fastimus, P2 usually has to get a Conduit as their first tech building, because all of their lines end up with 4 Gold after buying their Drones for the turn. However, a Conduit is noncommittal and flexible enough that this usually isn’t too big of a deal.
P2 Honorable Mentions
Fourth Engineer Natural Conduit: 1. DD 2. DDE 3. DDDE 4. DDDDC.
This build is realllly high economy. Fourth Engineer tends to be a bad idea – you can get to 27 Drones just by staying on three Engineers and making three Drones per turn for a while if you really need to. That said, this build can be good in sets where there really isn’t that much you want to do except make Drones for the first five or six turns. This can happen when there’s a perfect storm of a really good absorber, good soak, and not particularly good attackers. The other advantage of this build is that it leads into a fairly natural 5. DDDDA, which, if you can get away with it, is basically the ultimate greed – you go high economy and you skimp on defense in order to get good early attackers (Tarsiers) going. Often, though, you’ll have to go into 5. DDDDB instead in order to be able to make a Wall.
P2 Masterbot build: 1. DD 2. DB.

Looks the same as p1’s, but it’s a bit higher economy, and so you can usually buy two Drones on your next turn. This build is only good when you really want a Blastforge first, but it is surprisingly decent when you do.
P2 Natural Blastforge: 1. DD 2. DDE 3. DDDE 4. DDDDE 5. DDDDDB

So, I said there was no good way for P2 to get a Blastforge out as their first tech building, unless they wanted to go for low-mid economy with the Masterbot opening. And that opening’s really ugly – it wastes an Energy. If only there was a way to get a nice, high economy Blastforge opening that didn’t waste any Energy along the way. Well, look no further than the P2 Natural Blastforge opening. This build leaves you with 23 Drones, and the maximum number of Drones you can have is 27, meaning you will only get one turn where you spend all of the energy your five Engineers are giving you. Then, once you’re up to 27 Drones, all of the Energy from the Engineers you’ve invested so much in will go to waste every turn. But, the important thing here is that you got to 27 Drones really fast, and you got a Blastforge first instead of a Conduit.
This is a meme build. Does it make any sense to actually play this opening in a game, ever? Maybe not. Would people have complained if I left it out of this post? Definitely. So here it is.

Leave a comment