
We’ll be looking at this set from the perspective of player 1.
There’s no absorber in the random set, so I’m thinking it will be a low or mid economy set, using Wall as an absorber. (The other option when there’s no absorber in the random set is to go for a very low economy strategy with an Animus as your only tech building, using Rhino as your absorber. This is pretty rare, and usually requires that there’s Grimbotch or Electrovore in the set. It won’t be happening here.)
The next units that stand out are Tatsu Nullifier and Amporilla – two Big Red units. They don’t have any synergy together – if we went for a big red strategy we’d be choosing one or the other – but it’s worth considering whether a big red strategy using one of them could work. Since there’s no absorber in the set, I’m already thinking that it probably won’t work. Big red usually needs a decent absorber in the random set, so that you can defend early attack and also so that you can get a big enough economy to power two Animuses without being too overteched. But, if the support is really good, a Tatsu or Amporilla strategy can be viable even without an absorber in the random set.
However, there’s not much support in this set – we’ve already mentioned that there’s no absorber, and there’s also no tech sinks or tech fixes (like Perforator or Chrono Filter). Immolite and Frost Brooder might both be Red, but they don’t support a big red strategy very well, since all they do is help you make more attack. You already have attack covered if you’re going for a double Animus strategy, so what you’re looking for is units that can help you on defense or units that can help you avoid being overteched. The only support in the set is Hannibull, which can be a powerful defensive unit with a not-too-demanding tech requirement. However, that by itself isn’t enough to make a big red strategy work, so we can safely ignore Tatsu Nullifier and Amporilla. This lets us narrow the set down to the remaining six units: Cryo Ray, Tantalum Ray, Immolite, Frost Brooder, Tesla Coil, and Hannibull.
When you’re on a mid-sized economy, you can’t afford a tricolour strategy – that would leave you overteched. We know we’re going to want a Blastforge for Walls, so that leaves us with the option of going for a Blue-Green strategy or a Blue-Red one. The Blue-Green strategy would use Tantalum Ray, Cryo Ray, and Tesla Coil, while the Blue-Red strategy would use Immolite, Frost Brooder, and Hannibull. Since we’re player 1, we’re somewhat reluctant to go Blue-Green – if our opponent also goes Blue-Green and uses the Natural Conduit opening, we’re probably going to be at a disadvantage. So let’s start by evaluating how the Blue-Red strategy would do against the Blue-Green.
Tantalum Ray and Tesla Coil are the two strongest attackers in the set (besides Tatsu Nullifier and Amporilla). If you go Red, the bulk of your attack will be Tarsiers and Immolites, which aren’t as efficient. The advantage Red has is that they can lead off with Tarsiers – although Tarsiers aren’t as strong overall as Tantalum Ray or Tesla Coil, they’re better attackers pre-absorb, because their 2 build-time is a much smaller downside in that situation. The other advantage of Red is Frost Brooder – it should be powerful in a set where the opponent will be breach-vulnerable (Tantalum Rays usually get clicked down to 1 health, and Tesla Coils are always breach vulnerable). This is especially true since the opponent will be defending with Walls, meaning that the Frostbites will get full value.
Hannibull, unfortunately, won’t play much of a role. Hannibull is only good when either your opponent can’t get up to 7 attack, so you can use Hannibull as an absorber, or when your opponent is over 7 attack, so that even when they kill it, you still get full absorb. With all the good attack in the set, a Blue-Green strategy shouldn’t have too much of a problem getting up to 7 attack, so getting absorb with Hannibull won’t work. But they won’t be going that far over 7 attack, either, and even if they are doing, say, 10 damage a turn, as soon as you make a Hannibull it will be easy for them to not click Tantalums in order to deal exactly 7 damage and kill your Hannibull without giving you absorb. On top of this, by the time the opponent is doing 9+ damage per turn, we most likely won’t have the resources to spare to make a Hannibull – we’ll be too busy making Prompt defense to avoid a breach. So Hannibull won’t help a Blue-Red strategy here – we’re left with Immolite and Frost Brooder.
Another downside of Blue-Red is that as attack ramps up, you are forced to use Rhinos for defense, while a Blue-Green strategy can fall back on using Forcefields, which are much better emergency defense than Rhinos.
The Blue-Green strategy has extremely powerful attack, solid defense, and on top of that, Cryo Rays are just really useful units as well as a handy Green Sink. Because of this, I think Blue-Green should beat Blue-Red, so even though it means being at a disadvantage against Natural Conduit, I would want to go for a Blue-Green strategy.
Now that we know we’re going Blue Green, we can think about how we’ll execute it. The final setup we’re aiming for is one Blastforge and two Conduits, with around 12-15 Drones. There are a variety of ways of getting there.
Slow Conduit (1. DD 2. DD 3. DDC) is my go-to build for player 1 in these low to mid econ Blue Green sets, but I think this set, with no defensive units, two powerful attackers, and Cryo Ray, is too fast for Slow Conduit
Fast Conduit is another option – specifically followed up by another Conduit. However, after 1. DD 2. DC 3. DDC, if our opponent goes for their standard Natural Conduit line, this results in the following position on turn 4:
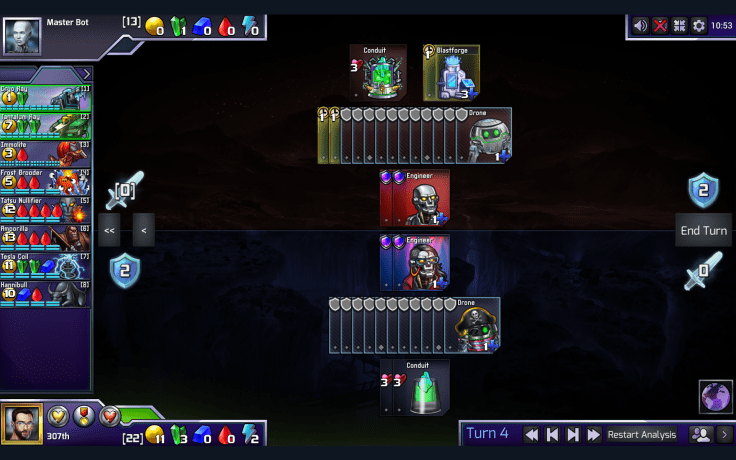
We want a Tantalum Ray and a Blastforge. The Blastforge is vital so that we can defend the Tesla Coil our opponent is threatening, and the Tantalum Ray is also important to get our attack started, which is the whole point of going for Fast Conduit. However, we can’t afford both, so our most likely response (4. DDB) puts us at a disadvantage.
So I think the best line for player 1 is slow double conduit: 1. DD 2. DD 3. DCC. Compared to the Fast Conduit line above, this line gets us 1 more Gold at the cost of 1 Green, leaving us in this situation on turn 4:

This allows us to get Tantalum Ray and Blastforge together on the same turn. Normally this build would have the problem of being overteched – you have 11 Drones, one Blastforge and two Conduits, meaning you don’t have quite enough Gold income to afford one Wall and one Tantalum Ray per turn. However, with Tesla Coil and Cryo Ray you’ll be able to spend your Green without too much of a problem.
In low to mid economy games like this, even small differences in your build can be crucial. The key is to try to think ahead a turn or two and see if you can set up your build so that you can buy the units you want smoothly. Here, the key was thinking ahead and realizing I would want Tantalum Ray and Blastforge on the same turn, and adjusting my build so that I had enough gold to do that.
-307th

Amazing blog and love this series. Looking forward to tomorrow’s!
LikeLike
Great series and an amazing blog. Without this resource I wouldn’t have been able to get into Prismata. Looking forward to more posts!
LikeLike
This was very in-depth, yet extremely easy to understand. Great work.
LikeLike