To prep for the upcoming tournament, I’m trying to deepen my understanding of the game. This series will be about trying to deepen my understanding of absorb and the absorb barrier. To begin, let’s quickly recap Absorb 101:
In Prismata, attack which does damage is a better investment than economy.
However, not all attack does damage. Some of it gets absorbed, and since absorb completely nullifies attackers absorb is an even better investment than attack. Players can absorb on one unit per turn; so the amount of absorb in a game is determined by the highest health defender in the set.
The amount that can be absorbed per turn is referred to as the absorb barrier. You have to overcome the absorb barrier in order to get valuable attack. So for example, if Omega Splitter is in the set, which is a 6-health defender, then the absorb barrier is 5, meaning that the first 5 attack you make will simply get absorbed onto Omega Splitter.

The higher the absorb barrier, the more economy you have to have before it becomes worth it to switch onto attack. To illustrate with an extreme example: say the absorb barrier is 5. If you have enough economy to build 1 attacker per turn, clearly that’s a huge problem. If you have enough economy to build 100 attackers in one turn, clearly it’s a non-issue and you should have switched from economy to attack a while ago. So you switch to building attack at the moment that it becomes better to do so than continuing to drone up.
So that’s Absorb 101. Look for the biggest health defender in the set, and absorb on that. The absorb barrier is the health of the biggest defender – 1; the bigger the absorb barrier is, the more economy you want before you start attacking.
However, that picture is actually not quite right. The absorb barrier is not simply the amount that can be absorbed per turn, but the amount of free value that can be gotten through absorb – or, to try to be even more precise, the amount the attacker has to spend on absorbed attack, minus the amount the defender has to spend to absorb it. To oversimplify: if the attacker has to spend 20 gold on their first 3 attackers, and the defender has to spend 10 gold absorbing that attack, then the absorb barrier is 10 gold. To go back to Omega Splitter, it’s unfortunate that your first 5 attack gets absorbed, but it does force your opponent to spend 15BBB to do it, which is not nothing.
So an updated picture of the absorb barrier would be: it is the cost of the attackers that get absorbed, minus the cost of the absorber. The bigger this gap is, the bigger your economy should be before you start switching to attack.
I attempted to estimate this cost as best I could in the New Absorber Tier List – this is the “value” I refer to there. This is the best way I know of to think about absorbers, but it turns out that estimating the value of an absorber is really hard. Let’s go through some examples and try to estimate the absorb barrier in each one.
In order to estimate these values, we’ll have to do a bit of math. When I’m doing math, I convert everything to gold, so that everything is comparable. For this series I’ll use these values:
red = 1 gold
green = 1.25 gold
blue = 1.5 gold
1 prompt defense = 2.3 gold
We also have to consider the value of time. You can make extremely efficient investments every turn in Prismata, so it’s very important to consider what time a cost is paid on – delaying a cost for one turn is extremely valuable. To measure this, we estimate the per-turn return on investment – referred to as inflation – and divide future gold values by the inflation per turn.
Some common inflation values:
1.28 for early game in high-econ sets where energy is valuable
1.33 when you are pre-absorb but you don’t feel limited on Energy
1.4-1.5 when you’re over the absorb barrier
and higher when you or your opponent are really close to getting breached, holding Drones etc. For most absorb situations we’ll use 1.33.
First Example: Wall vs. Two Tarsiers
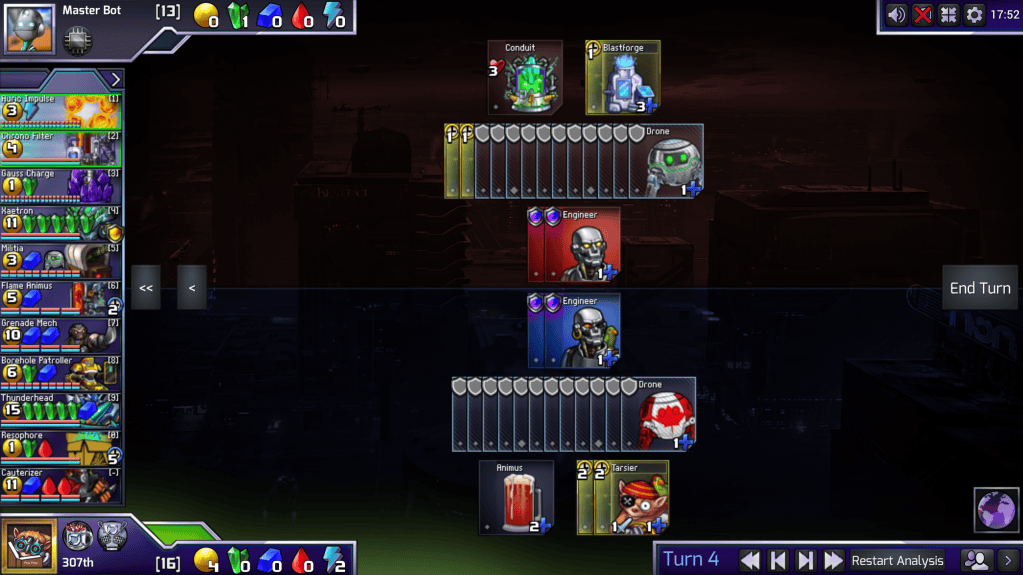
A classic! Tarsiers are considered a good first attacker – they are cheap permanent attackers with their only downside being their high build-time, and the high build time matters less pre-absorb where your attack is just getting absorbed. Alright, here the attacker spends 8RR = 10 gold, then 1.5 turns later the defender spends 5B = 6.5 gold to defend.
attacker_cost = 10
defender_cost = 6.5 / 1.33^1.5 = 4.24
absorb_barrier = attacker_cost – defender_cost = 5.76
Alright! So, when facing Wall absorb and overcoming it with Tarsiers, the absorb barrier is about 5.76 gold. This is useful as a reference. It also makes sense intuitively – the Tarsiers cost 10 gold, so the absorb barrier has to be something less than that – specifically they’re 10 gold minus the cost of building a Wall in 1.5 turns, which turns out to come out to 5.76 gold.
Second Example: Wall vs. Steelsplitter + Gauss Cannon
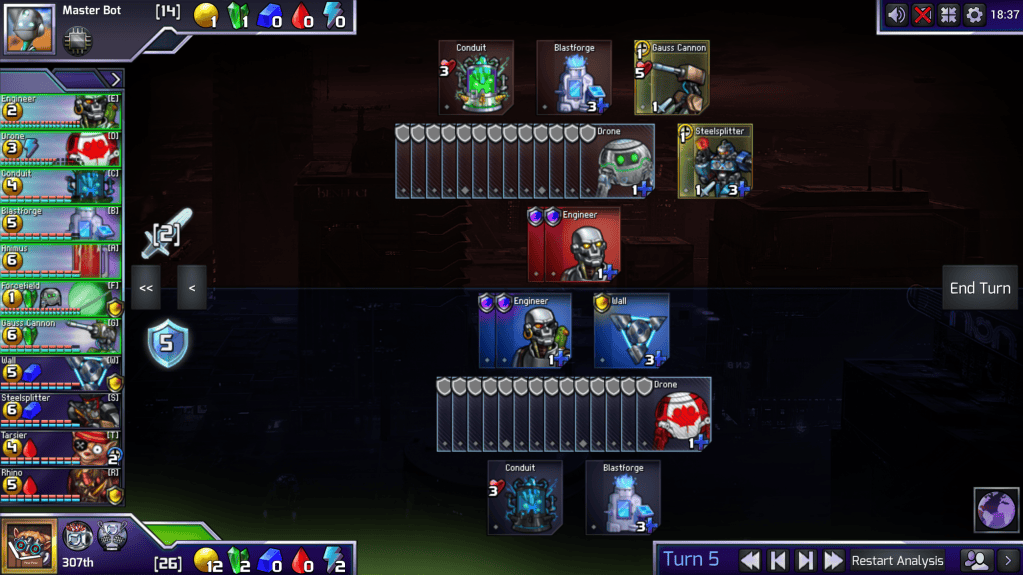
Here’s another classic (bad) example – building a Steelsplitter and Gauss Cannon into a Wall. This is pretty rough, you should try to avoid doing this wherever possible. But let’s see if the math agrees.
attacker_cost = 7.5 + 7.25 = 14.75
defender_cost = 6.5 / 1.33 ^ 0.5 = 5.64
absorb_barrier = 9.11
Wow, that’s way worse! Notice that, since the opponent has to build their Wall right away rather than in a turn and a half, the defender’s cost is higher. Even still, the absorb barrier is over 50% higher just from using Steelsplitter + Gauss Cannon instead of Tarsiers – pretty rough. But wait – this isn’t usually how it’s done.
Third Example: Steelsplitter -> Wall -> Gauss Cannon
Players know about the absorb barrier and try to avoid smashing directly into it when they can. Instead, they try to build annoying amounts of attack that make the opponent start absorbing without getting full value. So, if you are regrettably using Steelsplitters to attack, the classic way to overcome the absorb barrier would be to make just one steelsplitter first:
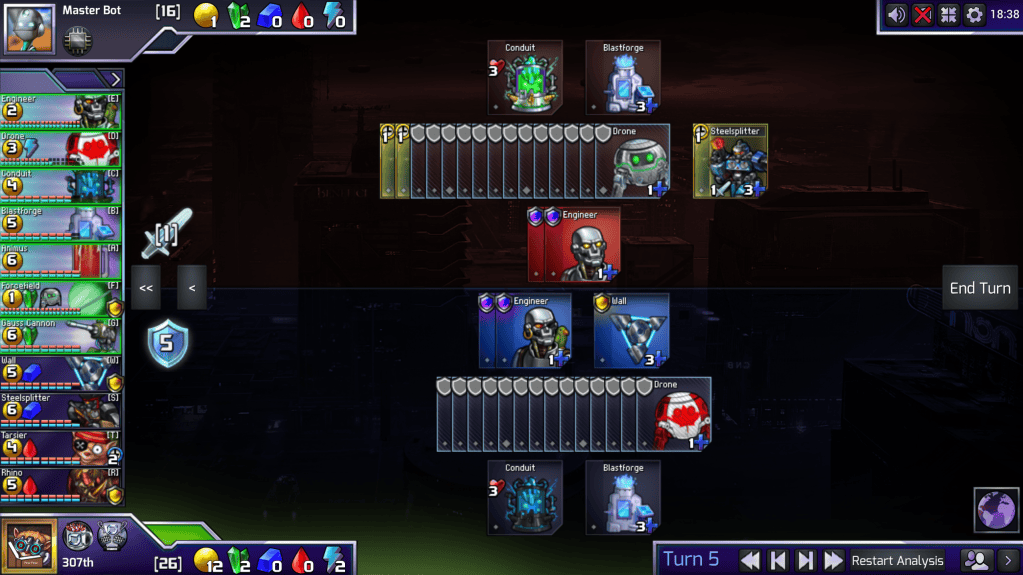
Then after that forces out a Wall, we can make a Gauss Cannon (and presumably more of other attack) on the next turn.
Little tactics like these to reduce the pain of the absorb barrier are extremely common in Prismata, and we need to consider them when considering how big the absorb barrier is. Alright, let’s redo the cost calculation:
attacker_cost = 7.5 + 7.25 / 1.33 = 12.95
defender_cost = 6.5 / 1.33 ^ 0.5 = 5.64
absorb_barrier = 7.31
That’s better! Still not as good as Tarsiers though.
Still, there’s one thing that bugs me about this calculation. It is true that you are spreading out the cost of overcoming the absorb barrier over two turns, and that by delaying part of the cost, you can invest in something else (typically: two Drones) in the meantime. If it’s two Drones, then you get +2 gold from that, so it makes sense that our calculation has this method of overcoming the absorb barrier as costing about 2 gold less than the previous one. But… the whole point of overcoming the absorb barrier is to unlock the ability to invest in attack, and this method unlocks that ability a bit later. Specifically, the previous method has you reach the absorb barrier on one turn, and then on the next turn you can fully invest in sweet damage-dealing attackers. Whereas this method, by deferring part of the cost of overcoming absorb onto the next turn, means you can’t fully invest in attackers on that turn. How do we account for that? Well, we can simply observe the position in one line compared to the other. With the single-splitter first line, here’s how the next turn looks:
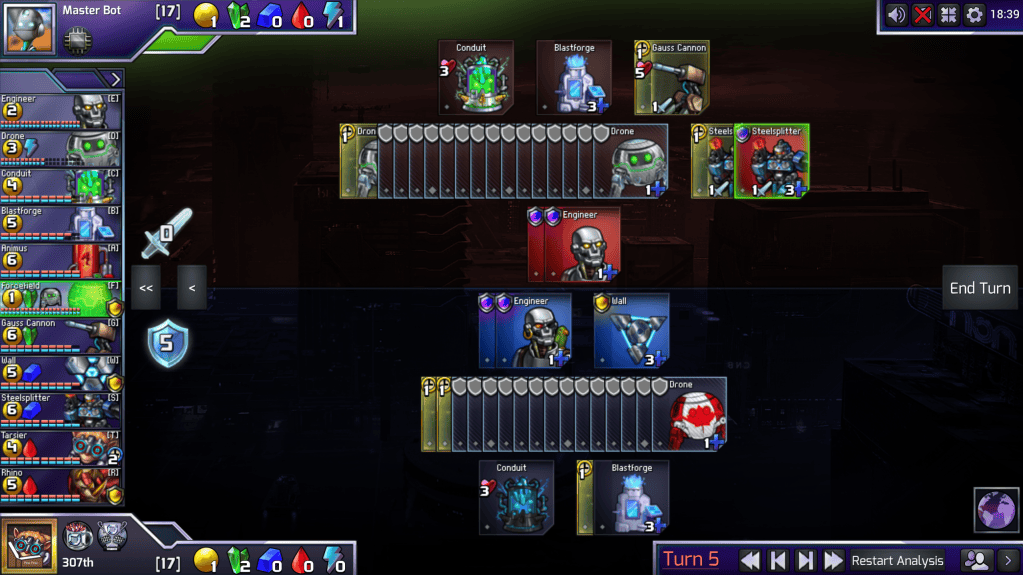
Here’s the Splitter+Gauss line’s next turn:
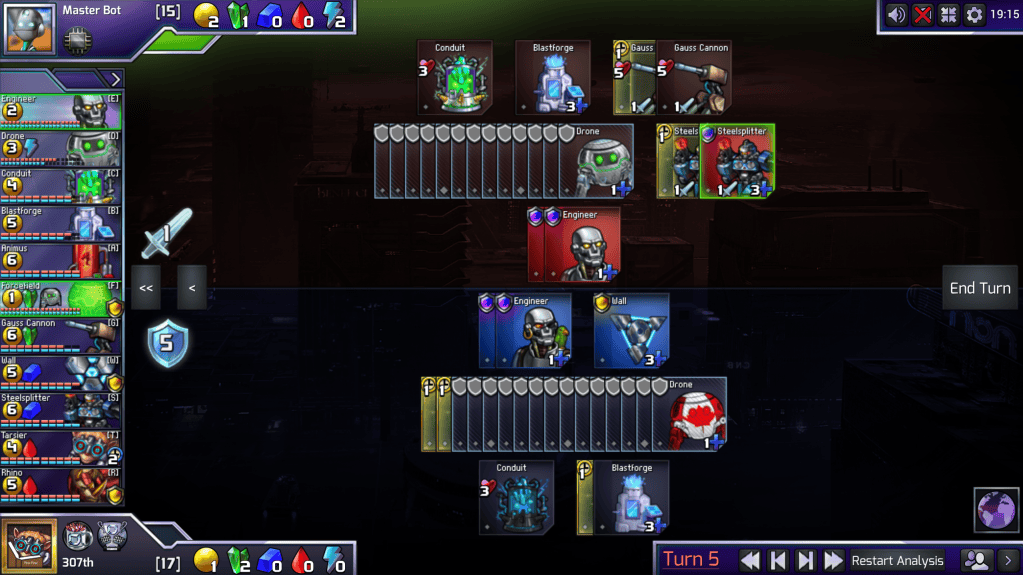
Counting it up, we can see that the double-attacker line ends up up one attacker, while the single-attacker line ends up 3 Drones. An attacker is roughly worth 2.5 drones, so we can see that the single-splitter line is better, although not by as much as you might naively think.
The real takeaway though is how good the double-Tarsier line is – it both has the large efficiency advantage, and since you’re building two attack you can directly get into building attackers that deal damage on the very next turn.
Conclusion
That does it for this first post. It’s quite short, but the concepts I wanted to introduce were the absorb barrier, calculating the absorb barrier from the perspective of the attacker, the fact that different attackers can lead to different absorb barriers and therefore different economy sizes, and considerations like how building a small amount of attack first can lead to a less painful transition but do make overcoming the absorb barrier take longer and therefore doesn’t let you start investing in attack as fast.


Leave a Reply